Cloud Computing Essentials
Lab Activity
Migrate an existing website to static hosting on Amazon S3 in order to improve web application reliability.
What is Amazon S3 and how is it used for static website hosting?
Using Amazon Simple Storage Service (Amazon S3), you can store and retrieve any amount of data from anywhere. You can also store any type of data.
To store data in Amazon S3, you work with resources known as buckets and objects. A bucket is a container for objects. An object is any type of file and any metadata that describes that file.
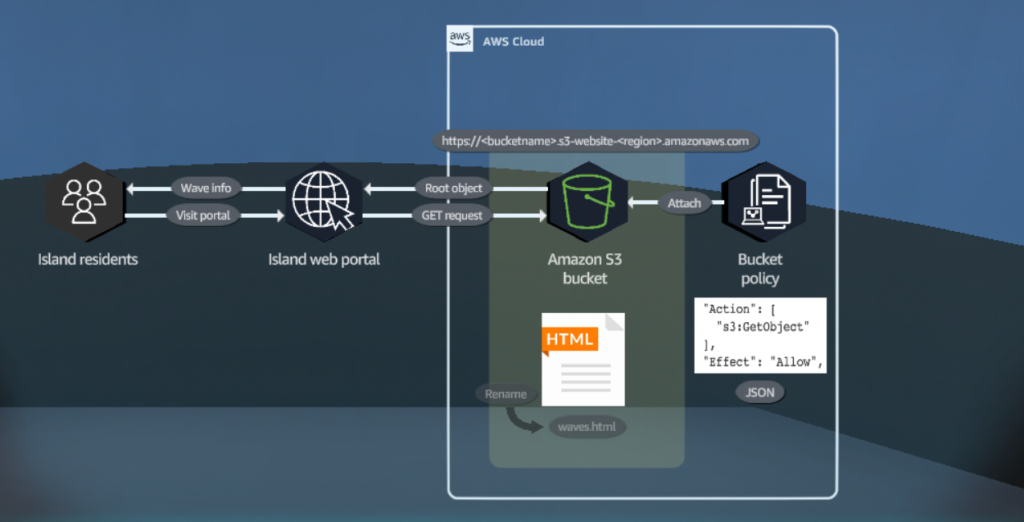
This solution uses an Amazon S3 bucket to host a static website. In Amazon S3, the static website can sustain any conceivable level of traffic, at a very modest cost, without the need to set up, monitor, scale, or manage any web servers.
Files that support the webpage functionality, such as client-side scripts and style sheets, are uploaded into the S3 bucket together with an HTML file. You can configure any of your S3 buckets as a static website.
When an S3 bucket is configured for website hosting, the bucket is assigned a URL. When requests are made to this URL, Amazon S3 returns the HTML file, known as the root object, that has been set for the bucket: https://<bucketname>.s3-website-<>region.amazonaws.com.
For others to access your bucket or objects, permissions must be configured to allow access. These permissions are configured by creating a bucket policy.
The bucket policy defines who can access the bucket and what type of operations can be performed. The bucket policy is written in the JavaScript Object Notation (JSON) format.
JSON is a human-and computer-readable format used to store and retrieve data. JSON is used by many applications and throughout AWS
Cloud Quest Lab Activity
Island residents visit the island web portal for wave information, which invokes a GET request from the portal to the URL of the static webpage. The initial root object is named index.html.
In the DIY portion of the solution, you will rename the index.html in the S3 bucket to waves.html. You will then update the S3 bucket settings to use the renamed root object.
- Create an Amazon S3 bucket.
- Enable static website hosting on the S3 bucket.
- Secure the S3 bucket by using a bucket policy.
- Rename index.html to waves.html.
- Test access to the webpage hosted on the S3 bucket
Step 1: Create an AWS Account
- Create an Amazon AWS account and navigate to the AWS Management Console.
- In the top navigation bar search box, type: “S3” and click on the S3 icon.
- In the Buckets section, click Create bucket.
💡 NOTE: If following along with the lab, download the associated Lab Files and use the Lab’s account not your own, otherwise it may incur charges.
Step 2: Create an Amazon S3 Bucket
General Configuration
- In the General configuration section, for Bucket name, type a unique name for your bucket, and then copy or save the name somewhere because you will need it later.
- The AWS Region may stay as default or you can change it to the desired one. For Cloud Quest lab purposes, the region must be US East (N. Virginia) us-east-1.
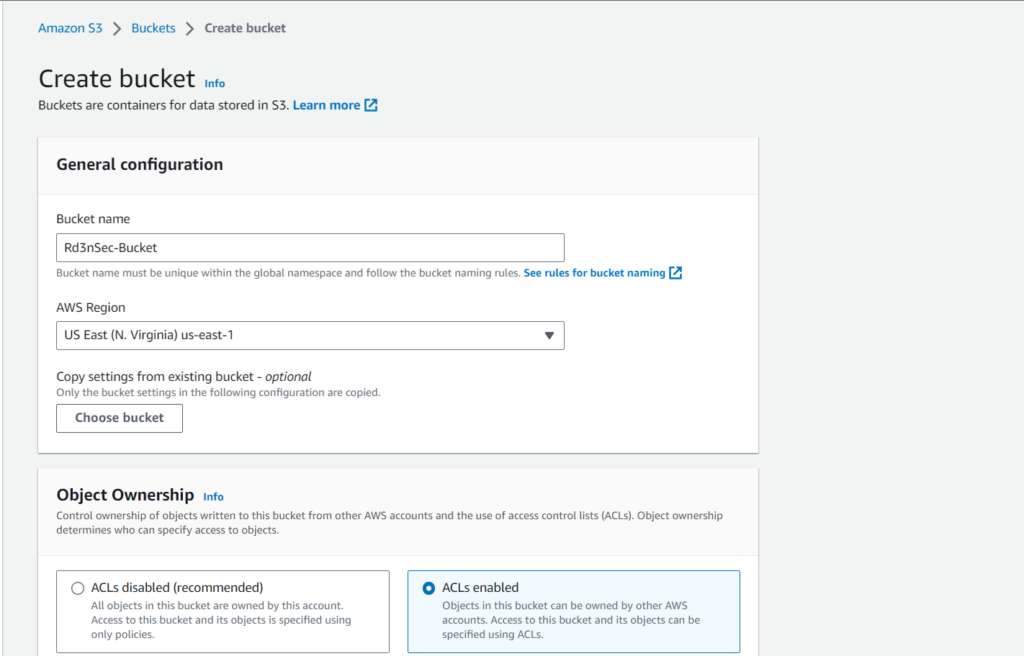
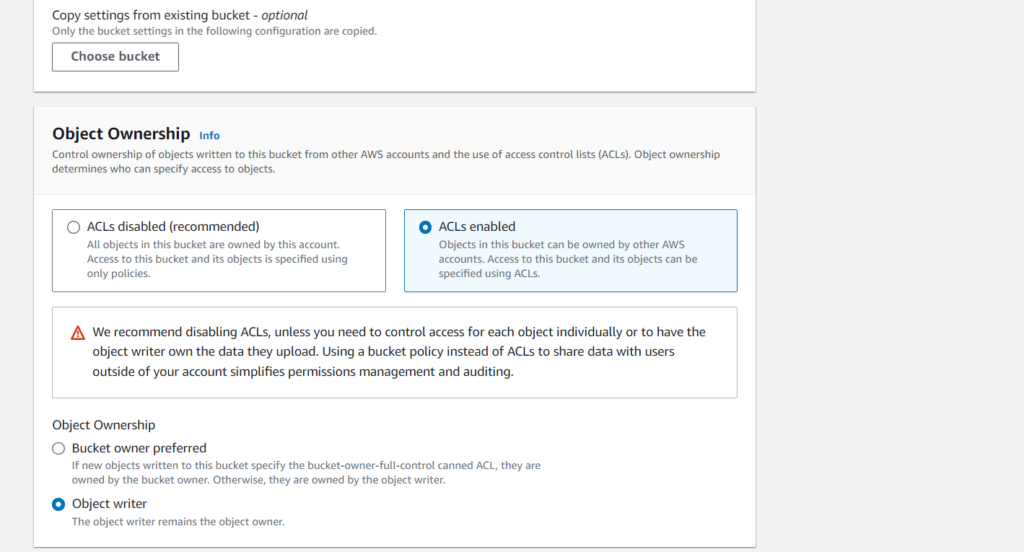
Object Ownership
- In the Object Ownership section, choose ACLs enabled. This is for AWS to allow us to make all of the objects related to our website publicly accessible.
- Select Object writer. With this option, the account that uploads the object becomes the owner of that object. This means that the uploader’s account is recorded as the owner in both ACLs and headers
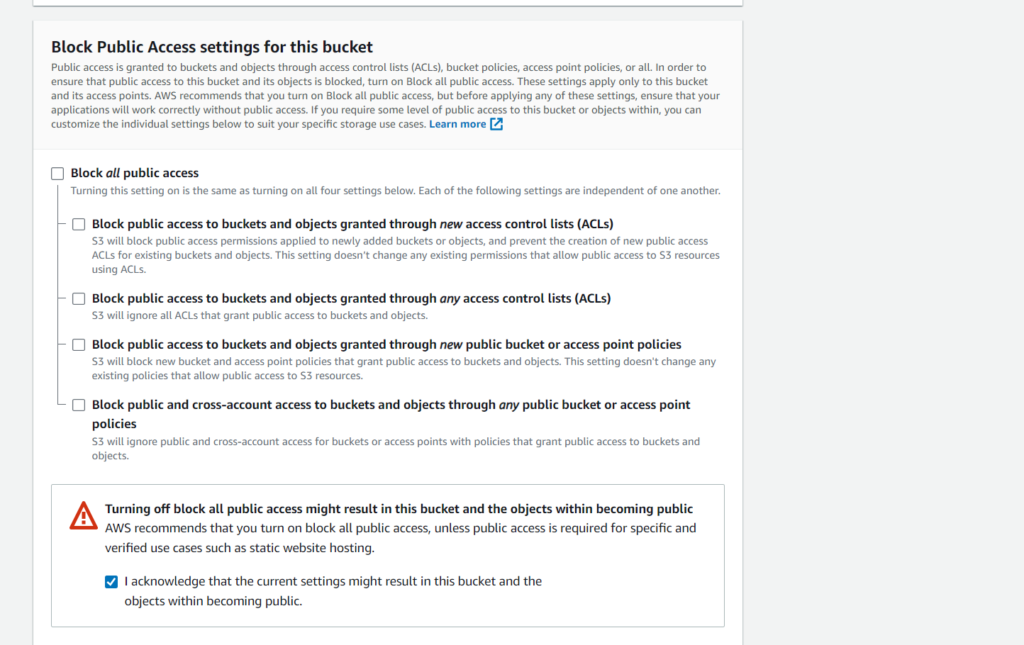
Disable Block Public Access
- In the Block Public Access settings for this bucket section, clear the check box to deselect Block all public access.
- In the warning alert, check the box to select the acknowledgement statement. By default, new buckets, access points, and objects do not allow public access.
Select the Default Encryption
- For Encryption key type, keep the default option: Server-side encryption with Amazon S3 managed keys (SSE-S3).
- For Bucket Key, keep the default option of Enable.
- Click Create bucket.
Step 3: Upload Website Files
- Within the Amazon S3 console scroll to the Buckets section, and click on the recently created bucket.
- On the Objects tab, click the upload button.
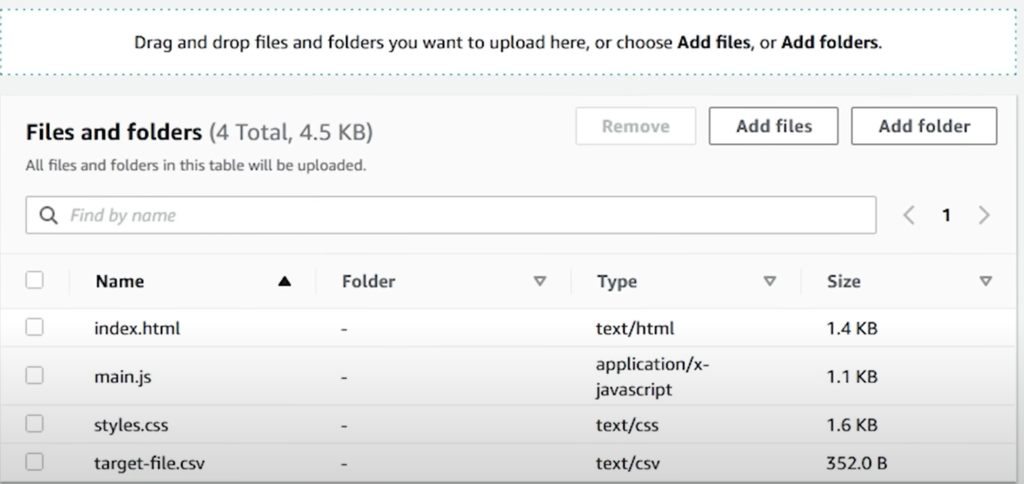
- In the Files and Folders section, click Add files or Add folder.
- Select the files and folders relative to the static website that will be hosted on the S3 bucket.
- Click Upload.
- Review the Files and folders section to ensure all the required files have been successfully uploaded to the S3 bucket.
- Click Close.
Step 4: Enable Static Website Hosting
- Click the Properties tab.
- Scroll down to Static website hosting.
- Click Edit.
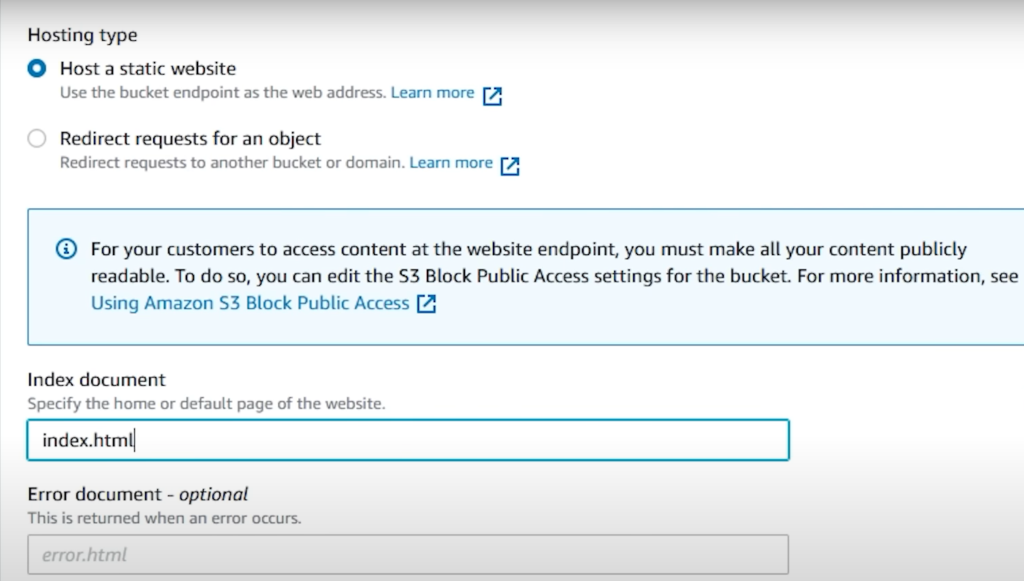
- For Static website hosting, choose Enable.
- For Hosting type, choose Host a static website.
- For Index document, type:
index.htmlor Specify the home or default page or the website. - Click Save changes.
Step 5: Update the Bucket Policy
- Click the Permissions tab.
- In the Bucket policy section click Edit.
- Under Bucket ARN, click the copy icon to copy your bucket’s Amazon Resource Name (ARN). The ARN is what uniquely identifies AWS resources.
- In the Policy editor window, delete the current content if any.
- Open (double-click) the policy.txt file on your device. The policy grants the
s3:GetObjectpermission to any public anonymous users. - In the policy, replace
Your_Bucket_ARNwith the bucket ARN that you copied earlier. Ensure that/*appears at the end of the ARN. - Copy the updated policy.txt file content, and then paste it in the Policy editor window.
- Click Save changes.
{
 "Id": "StaticWebPolicy",
 "Version": "2012-10-17",
 "Statement":[
  {
   "Sid": "S3GetObjectAllow",
   "Action":[
    "s3:GetObject"
   ],
   "Effect": "Allow",
   "Resource": "Your_Bucket_ARN/*",
   "Principal": "*"
  }
 ]
}
In essence, this policy allows public read access to all objects within the specified S3 bucket. Anyone can retrieve objects from the bucket using the GetObject action. It’s important to be cautious when providing public access, as it can lead to unintended exposure of data. Always ensure that you only grant permissions as needed and follow security best practices. This is for lab purposes only.
Step 6: Load the Website
- Back in Amazon S3 console, click the Properties tab.
- Scroll down to Static website hosting.
- Under Bucket website endpoint, click the copy icon to copy your bucket website endpoint.
- To load the website, open a new browser tab or window, and then, in the address bar, paste the Amazon S3 bucket website endpoint that you just copied, and press Enter.

Lab DIY Activity
Rename index.html to waves.html
- Within the Amazon S3 console go to the Objects tab.
- Click the checkbox for the index.html file.
- Click on the Actions drop-down menu and select Rename object.
- Rename the object to waves.html.
- Click Save changes.

